 www.woodsmithplans.com
 Opening: Level Up Your Workshop with a DIY Workbench! Tired of working on the floor or a wobbly table? Building your own workbench is the perfect solution! Not only can you customize it to your exact needs, but you can also integrate useful features like a built-in power strip. This guide will walk you through creating a sturdy and functional workbench with integrated power, step-by-step. Let's get started!
Materials and Tools You'll Need: Creating a workbench necessitates several tools and materials. Lumber: 4x4 posts (for legs), 2x4s (for frame and supports), plywood or MDF (for the tabletop and shelf) Power Strip: Choose one with multiple outlets and a sufficient cord length. Screws: Wood screws of various lengths (1 1/4", 2 1/2", 3") Wood Glue Safety Glasses Hearing Protection Measuring Tape Pencil Circular Saw or Table Saw Drill/Driver Screwdriver Clamps Sandpaper (various grits) Optional: Wood Stain or Paint, Polyurethane Finish Optional: Wire Staples or Cable Clamps
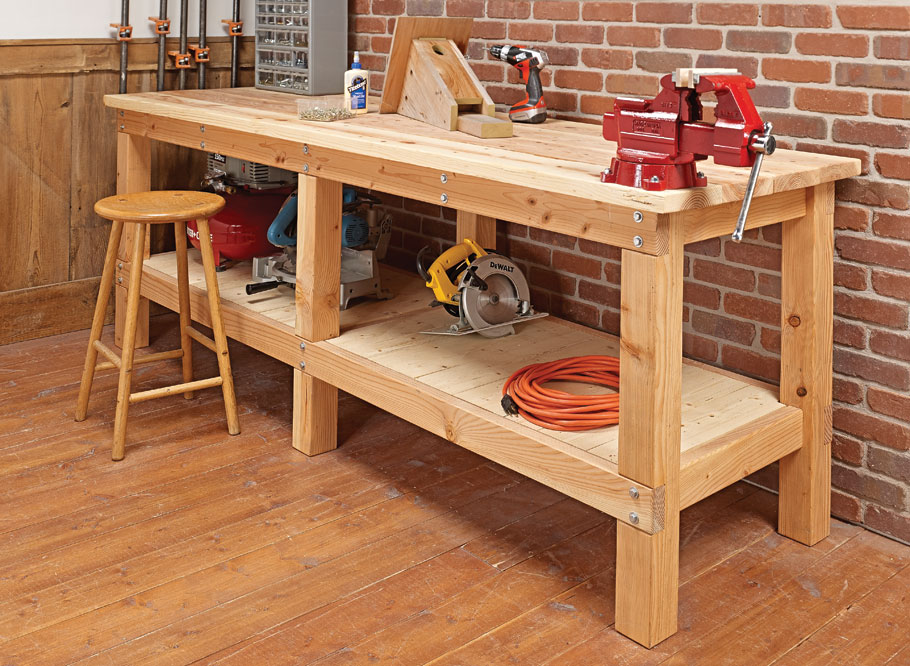
Step 1: Design and Planning Before you start cutting wood, plan out your workbench. Consider the following: Dimensions: How wide, deep, and tall do you want your workbench to be? Base it on the space you have available and the type of work you'll be doing. A common size is 6 feet wide, 2 feet deep, and 3 feet tall. Tabletop: Decide on the thickness and material for the tabletop. A double layer of ¾" plywood or MDF provides a solid surface. Shelf: Will you include a lower shelf for storage? If so, plan its dimensions and placement. Power Strip Placement: Where do you want the power strip to be located? Consider accessibility and safety. Think about mounting it to the side, back, or even underneath the tabletop. Sketching a simple plan with dimensions is extremely helpful.
Step 2: Cutting the Lumber Following your plan, cut all the lumber to the required lengths. Precise cuts are crucial for a square and stable workbench. Legs: Cut four 4x4 posts to your desired height (e.g., 36 inches). Frame: Cut 2x4s for the top frame (sides and ends) and the lower frame (if adding a shelf). Supports: Cut 2x4s for internal supports within the frame. These will add strength and stability. Tabletop and Shelf: Cut the plywood or MDF to the desired dimensions for the tabletop and shelf. Double-check your measurements before cutting!
Step 3: Assembling the Frame Assemble the frame using wood glue and screws. Build the Leg Assemblies: Attach the 2x4s to the 4x4 legs to create the support frame for the table top. Use wood glue and screws for a strong connection. Ensure everything is square. Attach the Sides and Ends: Connect the sides and ends of the frame to the leg assemblies using wood glue and screws. Clamps will help hold everything in place while the glue dries. Add Internal Supports: Install the internal 2x4 supports within the frame. Space them evenly to provide adequate support for the tabletop.
Step 4: Attaching the Tabletop Attach the plywood or MDF tabletop to the frame. Apply Glue: Spread a generous layer of wood glue on top of the frame. Position the Tabletop: Carefully position the tabletop onto the frame, ensuring it's aligned correctly. Secure with Screws: Use screws to attach the tabletop to the frame from underneath. Space the screws evenly around the perimeter and into the internal supports. Double Layer (Optional): If using a double layer of plywood or MDF, repeat the process for the second layer.
Step 5: Installing the Shelf (Optional) If you planned for a shelf, install it now. Build the Shelf Frame: Create a frame for the shelf using 2x4s, similar to the tabletop frame. Attach the Shelf: Secure the plywood or MDF shelf to the frame with glue and screws. Attach to the Legs: Attach the completed shelf unit to the legs at your desired height. Use screws to firmly fix the shelf unit.
Step 6: Integrating the Power Strip Now for the essential feature: the power strip. Determine Placement: Decide exactly where you want to mount the power strip (side, back, or underneath). Prepare Mounting: If mounting to the side or back, you might need to create a small shelf or ledge to support the power strip. If mounting underneath, ensure there's enough clearance. Secure the Power Strip: Use screws or heavy-duty adhesive to securely attach the power strip to its designated location. Make sure it's firmly in place and won't move during use. You can also use metal straps for added security. Cord Management: Use wire staples or cable clamps to neatly route the power cord along the frame of the workbench. This will prevent the cord from getting tangled or creating a tripping hazard.
Step 7: Sanding and Finishing Prepare the workbench for a long life. Sanding: Sand all surfaces of the workbench to smooth out any rough edges or splinters. Start with a coarser grit sandpaper (e.g., 80-grit) and gradually move to finer grits (e.g., 120-grit, 220-grit). Finishing (Optional): Apply wood stain or paint to customize the appearance of your workbench. Once the stain or paint is dry, apply several coats of polyurethane finish to protect the wood from scratches and spills.
Conclusion: Enjoy Your New, Powerful Workbench! Congratulations! You've successfully built your own workbench with a built-in power strip. This workbench will provide a sturdy and functional workspace for all your DIY projects. Enjoy the convenience of having power readily available and the satisfaction of building something yourself! Remember to always practice safety when working with power tools.
14 Super-simple Workbenches You Can Build — The Family Handyman
 www.familyhandyman.com
 Heavy-duty Plank Workbench
 www.woodsmithplans.com
 55" Workbench With Pegboard And Drawers, Dextra Height Adjustable Garage Work Bench With Power
 www.walmart.com


0 komentar:
Posting Komentar